

17 Jun Shark Vacuum Hose Replacement Full Guideline
If you have a shark vacuum and your hose is cut or split. Then you have to need to replace your shark vacuum hose. Here we have given easy and pro guidelines to replace your shark vacuum hose.
Remove Bottom Part
We’re going to replace the hose and the first thing we have to remove the bottom part. So, what we have to do is press the lever and pull it out and the whole piece needs to separates.
So, we can work on this unit, and then what I’m to do is I’m going to take a picture of the bottom piece.
I know where these screw holes are and when I take the screws out, if they are different sizes, I can then mock up the picture of this bottom, to know where the screws go back in place.
When I have to finish, I took a photograph of the bottom plate here with my camera and printed it out of my printer.
You can just draw this on a piece of paper and mark the holes where the screws are. you just need to take a magic marker and I’m just going to number the screw holes.
When you engage with pet hair then this is mandatory to take the best shark vacuum for pet hair.
Starting with the hole right over here. I marked this as number one center one is number two and number eight on the other side in the back. So, you can see I’ve numbered these screw holes.
I just use a container for pills and what I’m going to do is put the screws in these containers. The screws are the same size. I’ll just put them in the same container as the other screws of the same size.
I’m starting with screw number one now and this is a Phillips head screwdriver. I know in some of the older models or some other models, they use different kinds of screw holes and sometimes you have to buy a special set.
They’re star screwdrivers, rectangle screwdrivers and there are different kinds of shapes.
Once all the screws out you just turn it over very carefully because there were two, these two screws still stayed in there.
I couldn’t get them out. So just turn it over carefully and just simply, let’s go of this front white piece and there are some side pieces here. Just make sure that they stay in.
So, I just turn this upside down and put this aside, and now you have and now we’ve done as a, as a stop-gap until we found a new hose.
Which we got online and I’ll give you that details a little bit later as to where I bought it but we put some duct tape and you know the duct tape is for everybody.
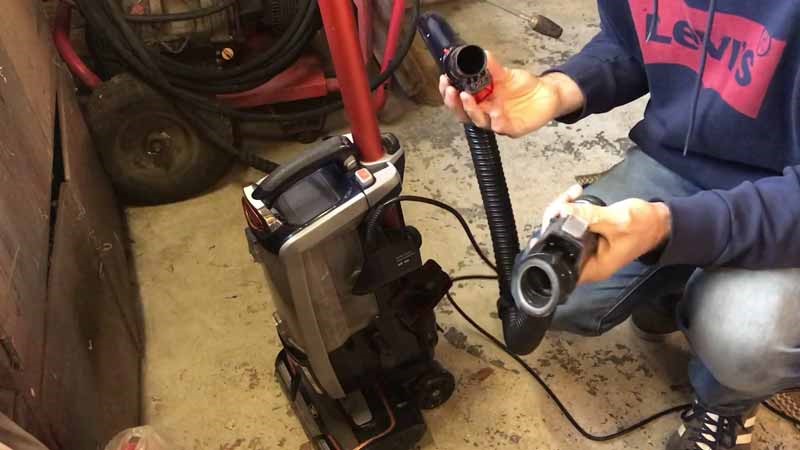
Take a Part
It works very well and independent. The next step is to take this piece off. So, I’m going to just lift it up to show you where the screws are.
There are two screws down there and I’m going to take those screws out and that’ll take this whole plate off.
I have two separate cups in because these screws are going to be a different size and I have a little magnetic thing here to help get the screws out.
This will allow me to get the peace and that’s holding this end of the hose and I’m going to be taking this white piece out and you’ll see that pretty carefully.
All you need to do is to lift this little piece out very carefully and when you need to get to this piece right here, I’m going to remove this little connector very carefully.
This little connector here you have need to take this piece off entirely, so it won’t be in and you see that it comes off of those two little pins down there.
Remove Roller Brush
The next thing I’m going to do is I’m going to remove the belt from the roller, and then I’m going to lift the rollout, and this way I can now get to this piece here, that’s holding the hose and just you’ll notice over on the side, there’s a little button.
That’s kind of fits into the red slot. I’m just going to rotate a little bit to get it out of the slot. Now I’m going to rotate this clockwise to unscrew this little white piece from the hose.
Then theoretically, if I turn in the same direction, it’s going to unscrew the hose inside the mechanism. First, I’m going to take this tape off, and now with the tape off, you can see where the hose was split.
So now lifters also rotate it clockwise and we pull the hose out. I mentioned before that I was going to tell you about the hose replacement.
The next step is to then turn this counterclockwise until it screws all the way into the housing. Now we take this piece here and we know that this little white button.
Just going to have to go into this little hole down here. I don’t know if you can see it. So, I’m going to first turn this now and again, this is going to be counter-clockwise all the way.
And now the trick is to be able to get this back. So, I may have to stretch the hose a little bit.
Slack back here, get my head out of the way slot here. Pretty down on a little bit of an angle. And then squish this into place and it snaps into, and it snaps into the hole. Now you’ve got that connection with the role of backend dell time. First putting this piece back.
First, I’m going to put it back in its place again and you have some slots here, which goes over the top of the roller brush wheel and you also have slots here that go over the flange of hose connection.
Instead, it helps it fine up properly make sure it goes down and you got the headlights over here and then I just take this little connector and very carefully.
I’ll make sure it snaps all the way down into place. So now it’s a question of putting the screws back in and I’ll first start with the two small screws that I took out last.
Now it’s a question of putting it back together. We put the cover on and also put the screws in. I’m just going to tighten them up now we’ll take it.
I’ll make sure that we’re aligned up with these connectors connect is about here. So, we just turn it sideways snaps into place, and let’s turn it on.
Conclusion
So, guys hopefully this guide helps you a lot to replace your shark vacuum hose. When you replace a shark vacuum hose you have to be careful because it’s not so easy task.
To get more vacuum repairing tips and tricks follow our vacuuming blog homeplix.
Sorry, the comment form is closed at this time.